As most of you are well aware, Microsoft Dynamics 365 Human Resources is a sealed product. What many do not know is that small adjustments are possible! That is why one of our experts wrote this blog/guide to present you with a step-by-step visual of how to make a custom field in the system.
While there is an extensive set of fields out-of-the-box for managing a broad range of business processes, sometimes there is a need for a company to track additional information in the system. To accommodate this need, you can create custom fields to tailor the application to fit your business, provided you have permissions to the feature.
Microsoft Dynamics 365 Human Resources allows you to add and manage custom data fields across a wide range of forms, without requiring any coding or development effort. In today’s post, we will review this new feature.
Creating Custom Fields in Dynamics 365 Human Resources
Navigate to the form where the new field is needed.
In my case, I took the example of an Employee form
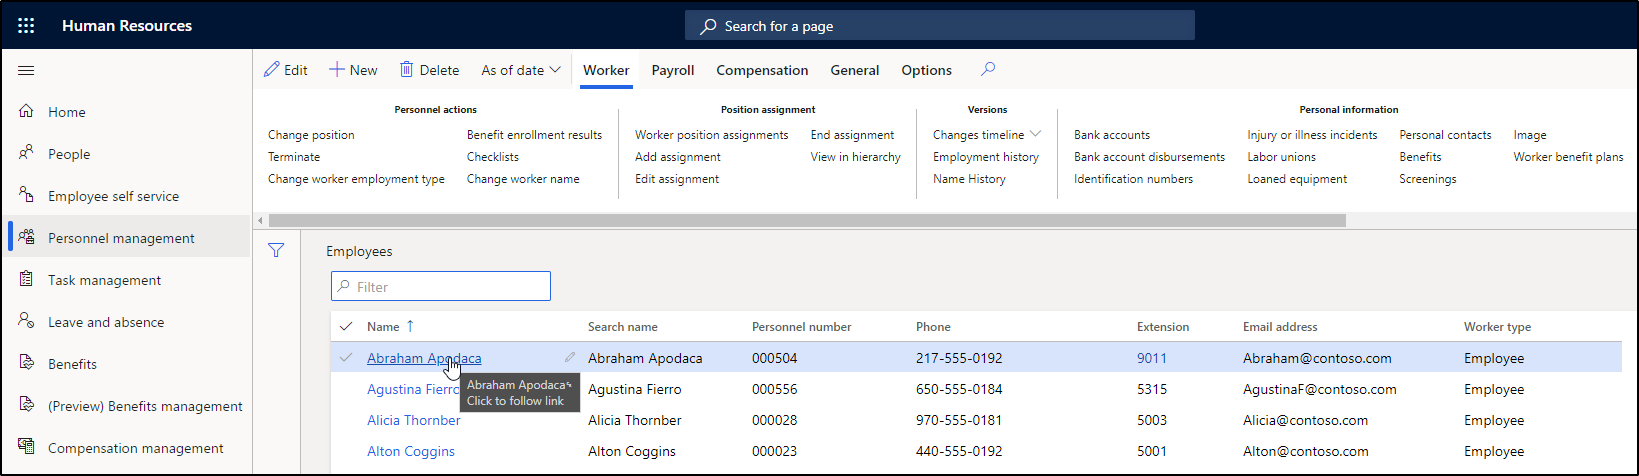
Click on any employee name and the form will open in a more detailed view.
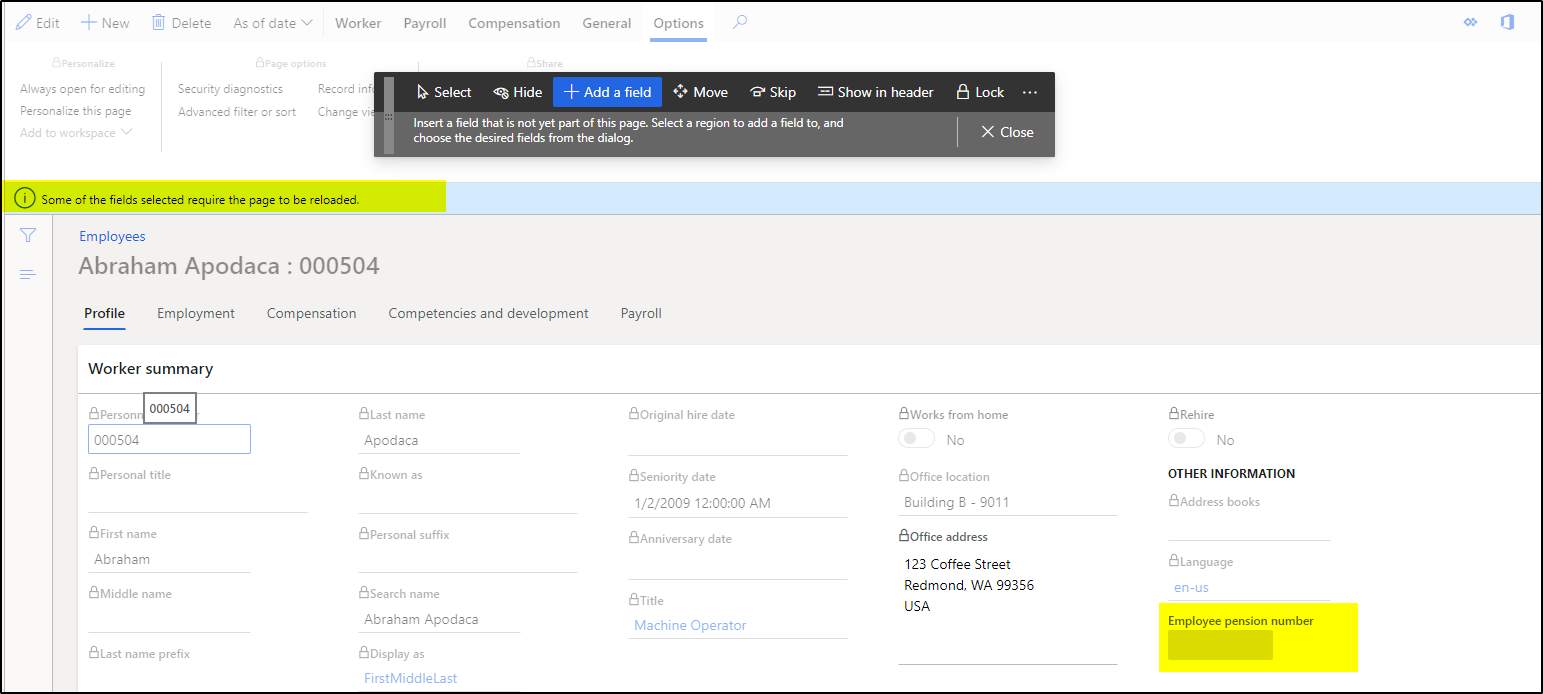
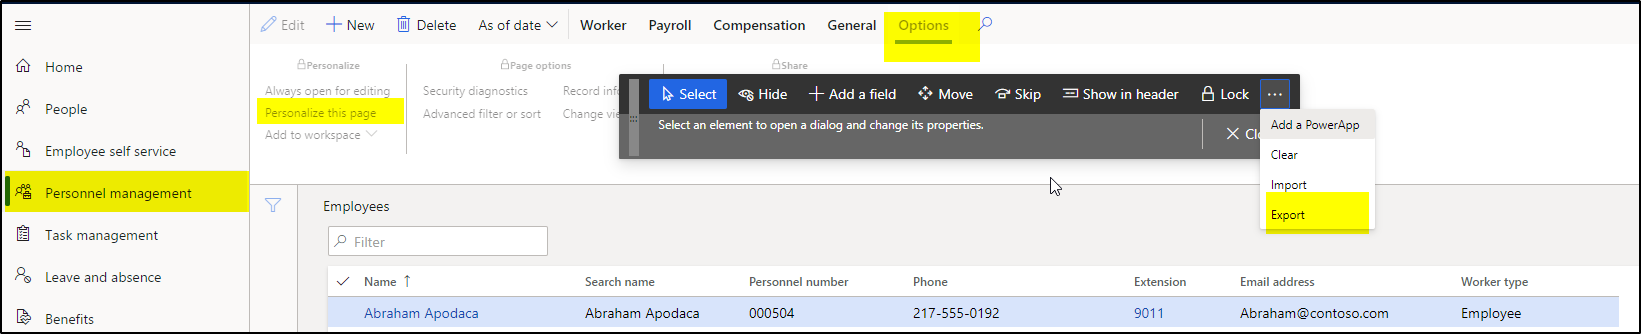
Open the personalization toolbar by selecting Options, and then Personalize this form.
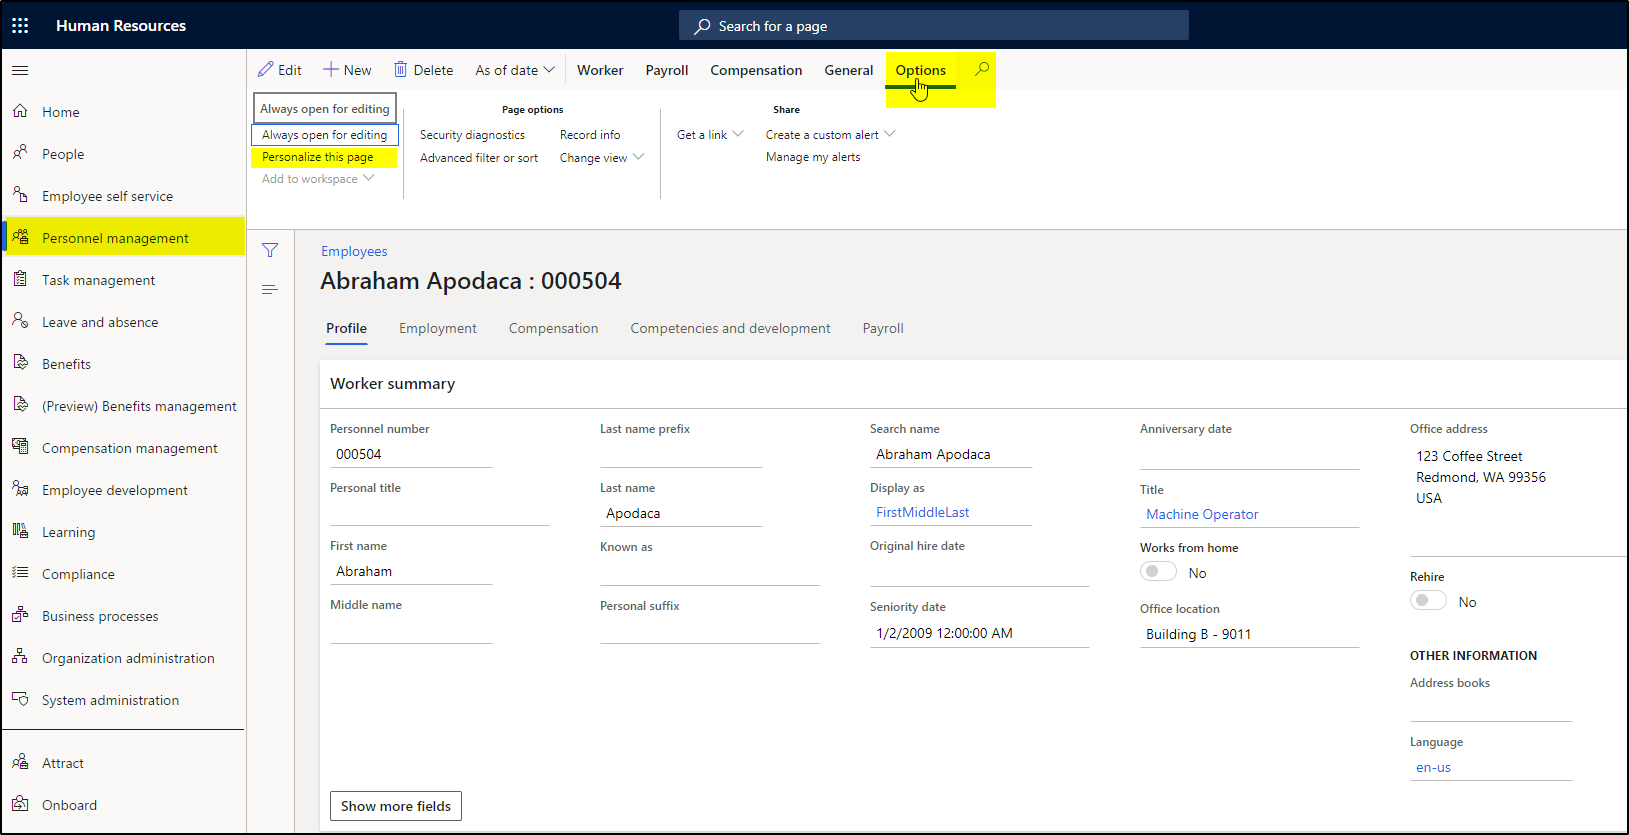
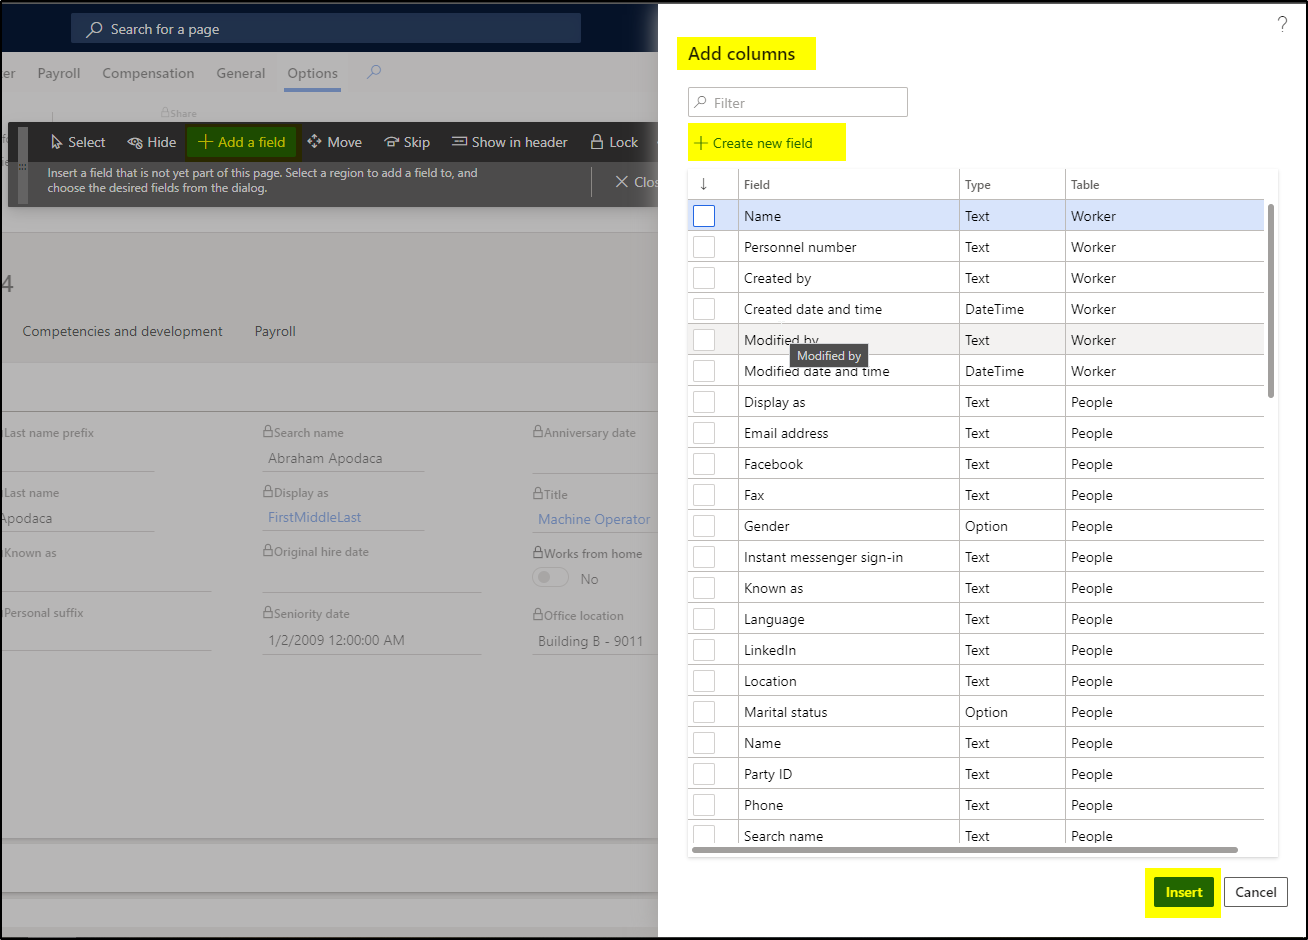
Click on + Add a field and Create a new field
Click the Create new field button above the list to initiate the process of creating a custom field. This will open the Create new field dialog box.
Note: If you do not see the Create new field button, you do not have the necessary permissions to use this feature.
Click the Create new field button above the list to initiate the process of creating a custom field. This will open the Create new field dialog box.
Note: If you do not see the Create new field button, you do not have the necessary permissions to use this feature.
- Select the database table where this field should be added. Note that only tables that support custom fields will appear in the drop-down list. See the section below for technical details on supported tables.
- Select the data type for the new field. The available data types are checkbox, date, date-time, decimal, number, picklist, and text.
- If you choose the text data type, you can also specify the maximum length of the text that can be entered in this field.
- If you choose the picklist data type, you can also select the set of valid values for the field.
- Provide a name, label, and help text for the field. The name corresponds to the physical field name in the database, whereas the label and help text are the text used to represent this field in the user interface.
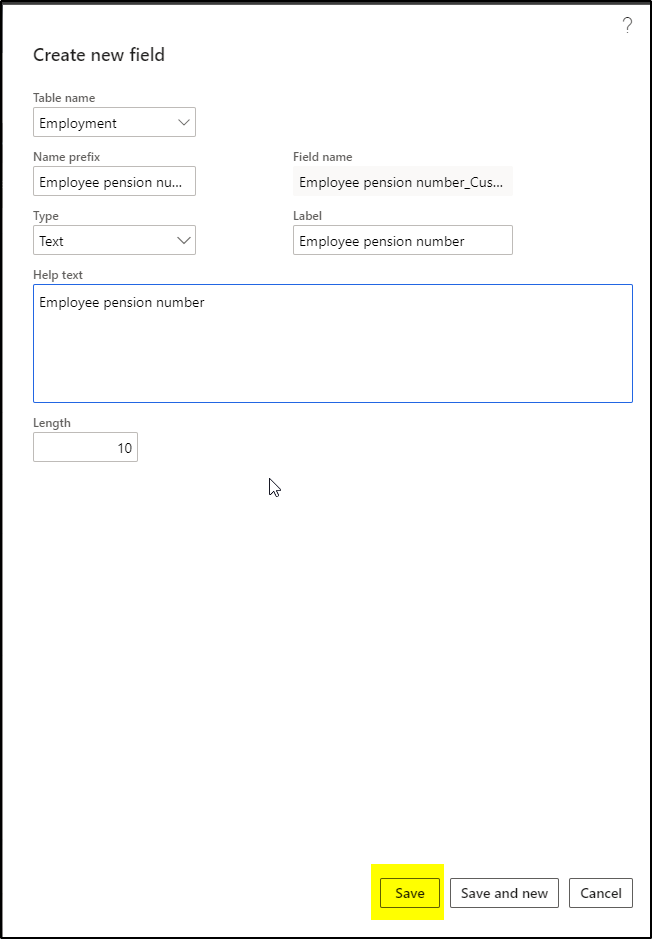
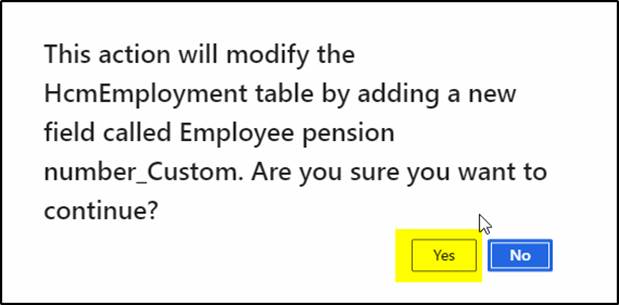
If this is the only field that you need to create for this form, click Save.
If you need to create additional fields, click Save and new and go back to the beginning. Note that there is currently a limit of 20 custom fields per table. Once you leave the Create new field dialog box, you will return you to the Insert fields dialog box.
Any custom fields that were just added will be automatically marked in the field list to be inserted into the form.

Click Insert to insert the marked fields into the selected region of the form.
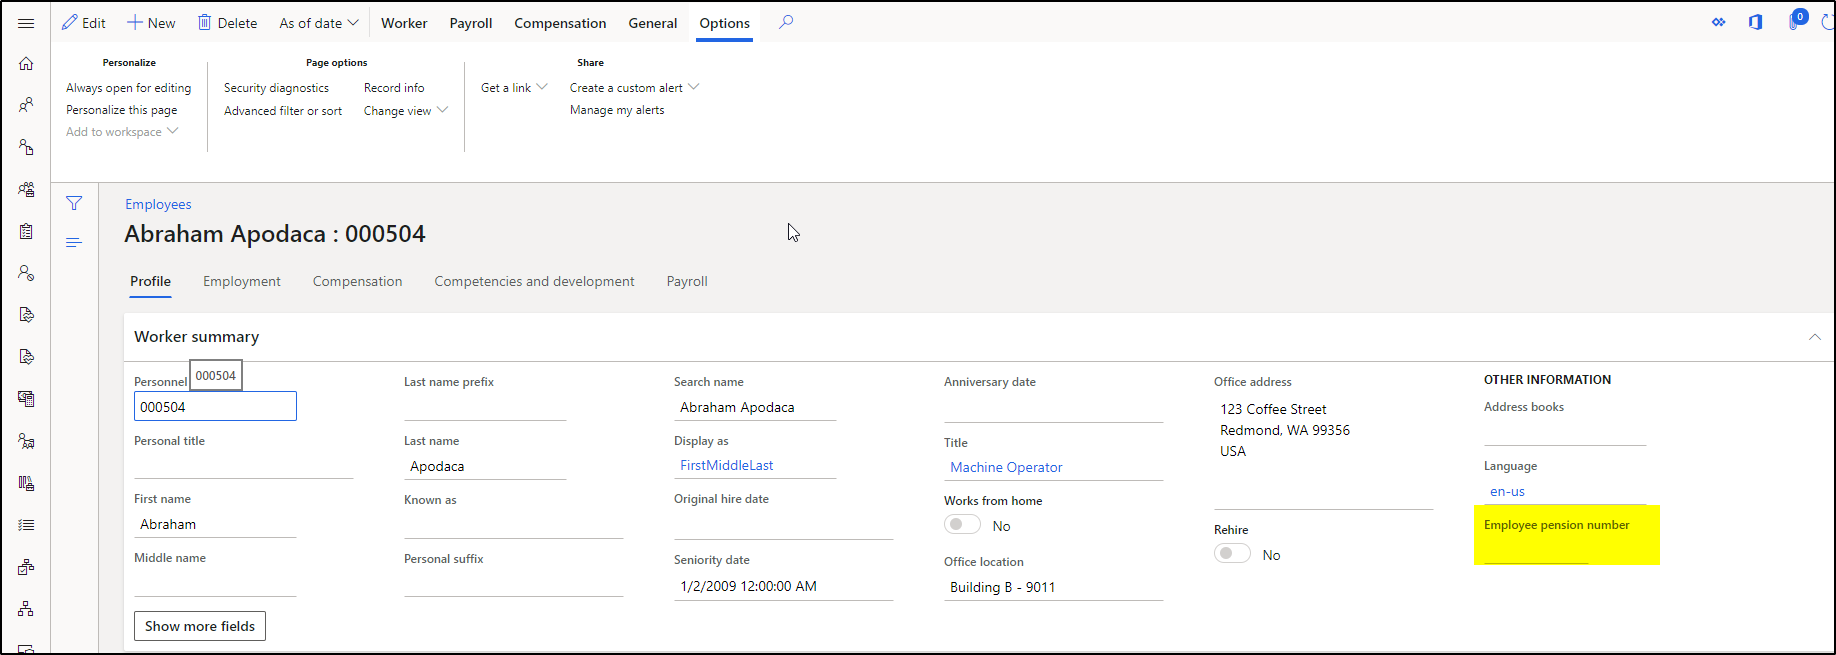
Refresh the form to see newly created in the Employee form.
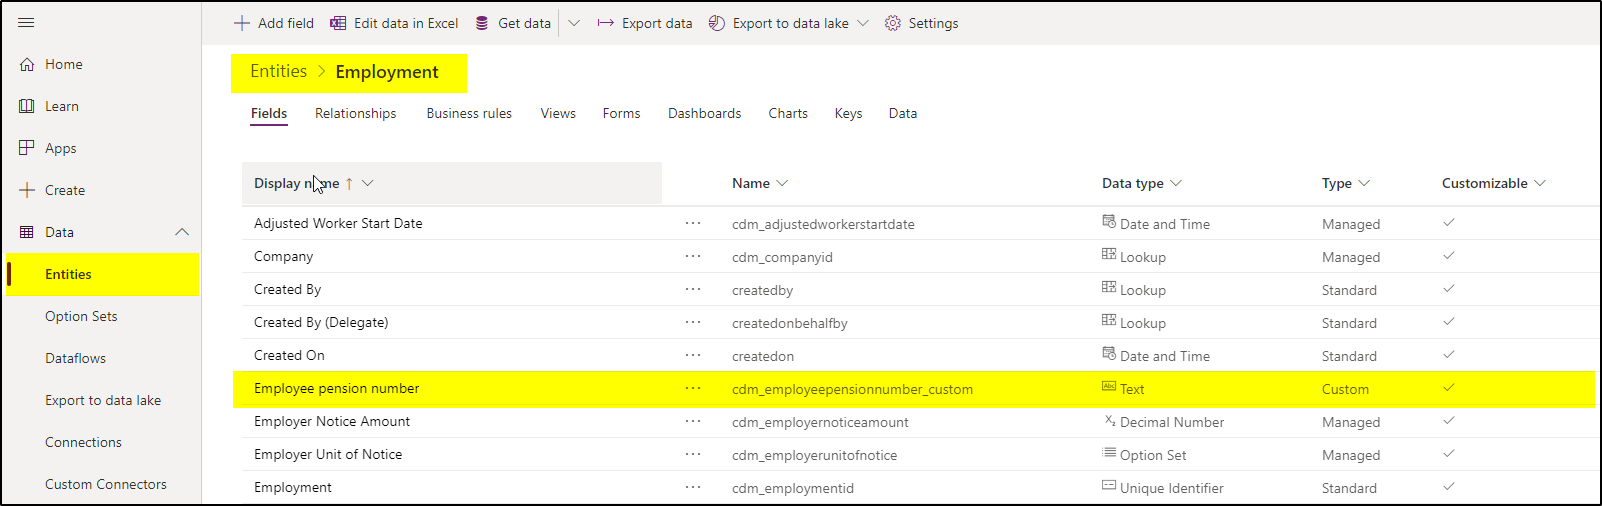
Now we can see the Employee pension number field.
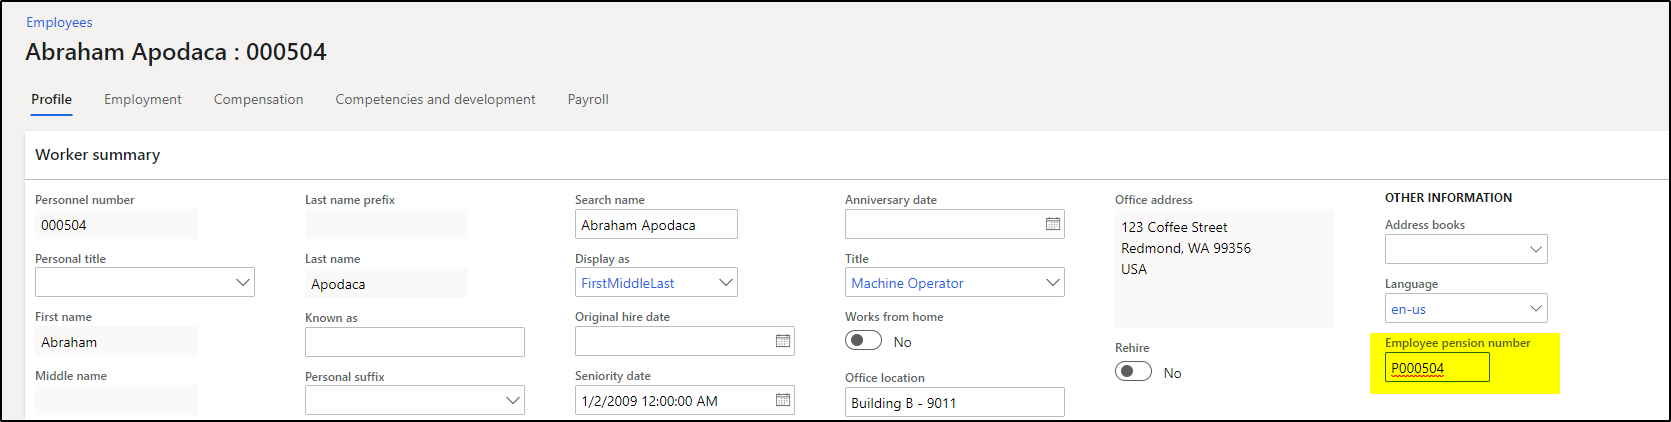
Now Edit the employee record and add some value to the Employee pension number field.
Expose Custom Field in CDS
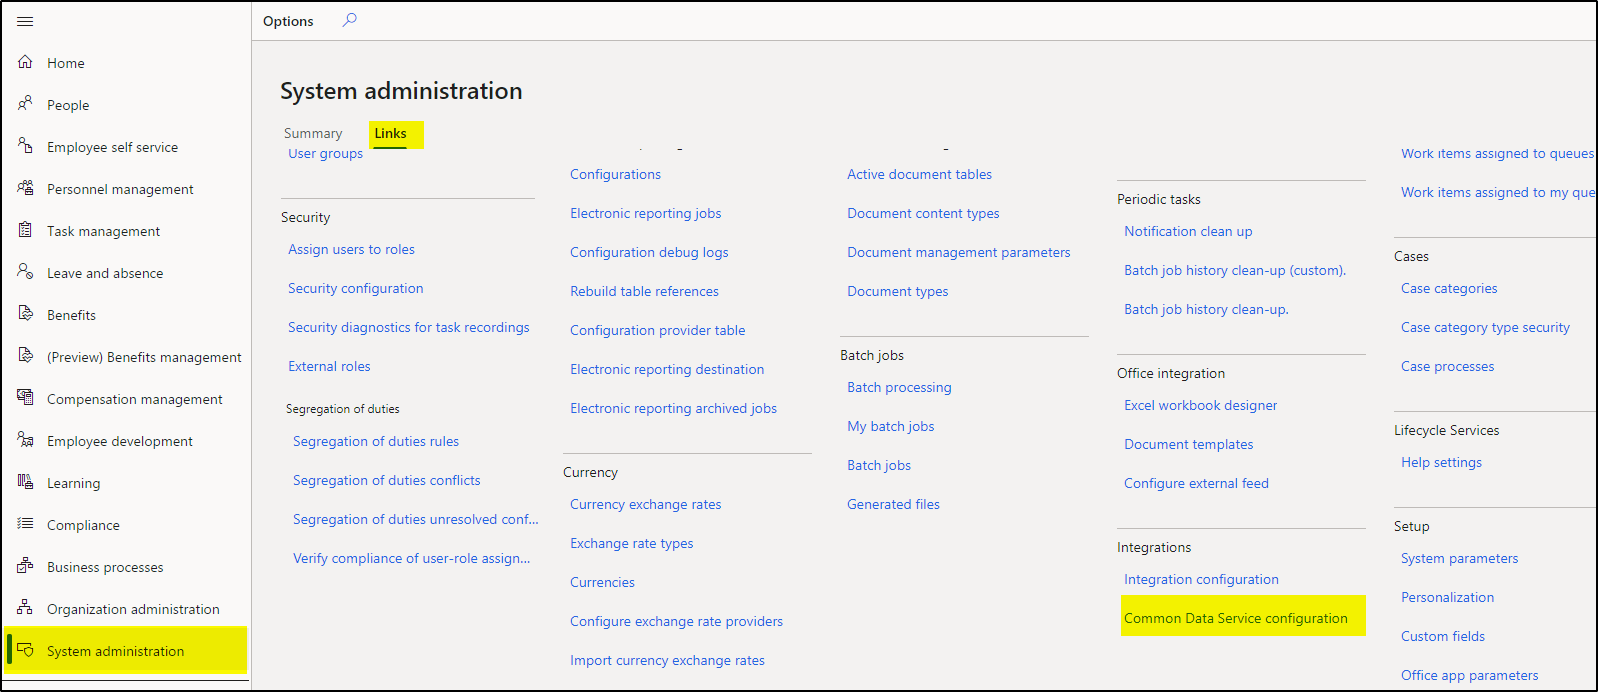
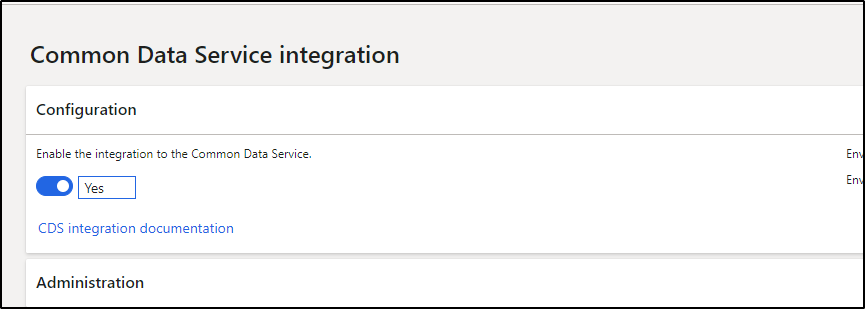
First check whether CDS integration is ON
Go to System Admin > Links > Integration > Common Data Service configuration
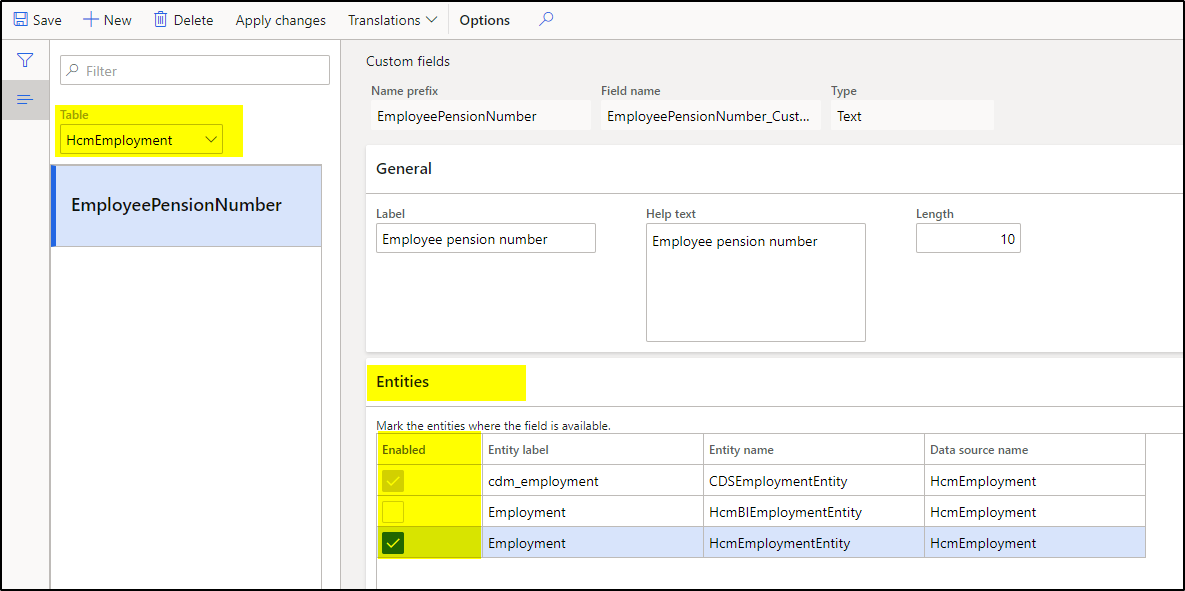
Go to System Admin > Links > Setup > Custom Fields
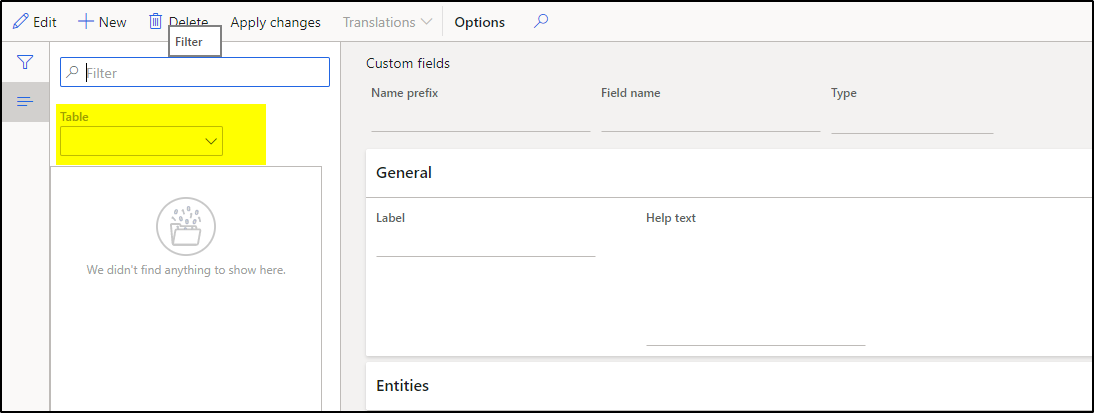
Select Table lookup and select the entity.

Select the table and it will show you the newly created custom field.
Edit the form and Enable the custom field for CDS and Dynamics 365 Human Resources entities.
Click on the Apply changes button.
![]()
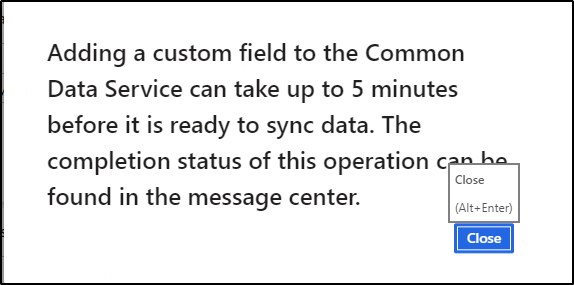
It will display a message box that explains it can take up to 5 min to display the custom field in CDS.
Verify Custom Field in CDS
Log in to Web.powerapps.com
Select the right environment for CDS
Go to Entities and Find the cdm_employment entity
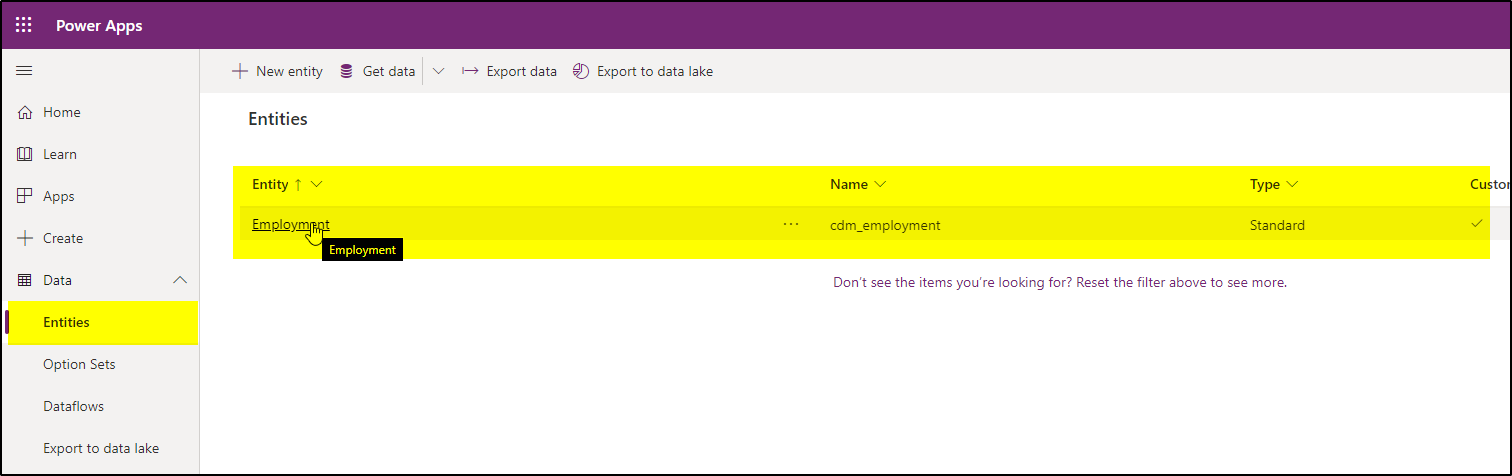
Click on Employment and verify custom field
Verify Data in CDS
There are many ways to Verify data in CDS;
- Go to Employment entity and check for Data tab
- Export the data and check for Employee pension number
- Edit the data in Excel and check for Employee pension number

Deleting Custom Fields
In some rare cases, you may decide that a custom field is no longer needed. When this occurs, a system administrator can choose to delete the field from the Custom fields page.
To do this, ensure that you have selected the correct field, click Delete, click Yes to confirm the deletion, and finally click Apply changes.

Sharing Custom Fields with Other Users
After you have created a custom field and exposed it on a form, you might want to provide this updated page view that includes the new field to other users in the system. This can be accomplished in two different ways using the personalization capabilities of the product:
-
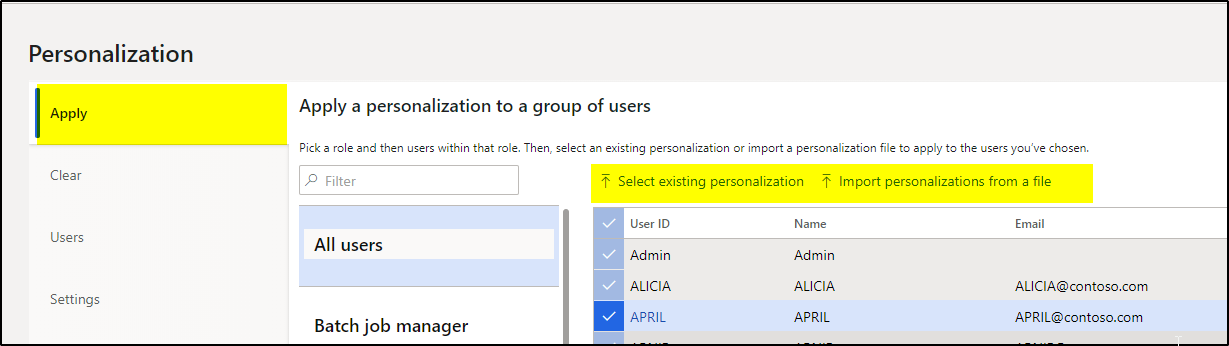
- The recommended route is through the system administrator, who can push personalization to all users, or a subset of users.
- Alternatively, you can export your changes (called personalization), send them to one or more users, and have each of those users import your changes.
The Manage option on the personalization toolbar enables you to export and import personalizations.
Export the personalization created for the custom field.
The best way to do this is to have your system administrator manage it.
Go to System Admin > Links > Setup > Personalization
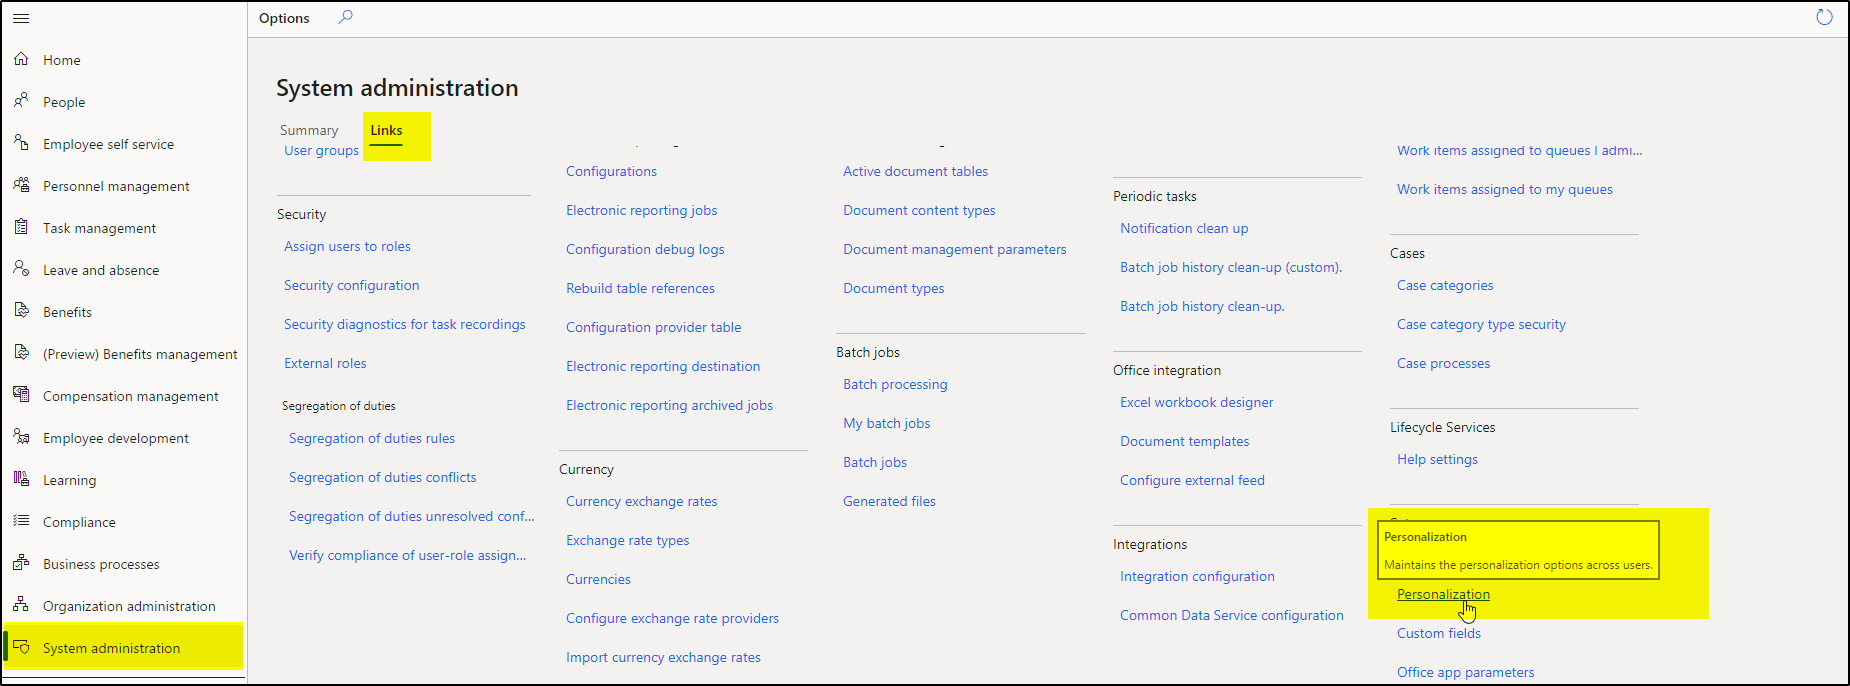
Select specific user(s) by their security role or simply select “All users,” and then either ‘Select an existing personalization to apply for those users,’ or import a personalization file for those user(s).
Troubleshooting
Custom field is not visible in CDS.
- We have to go to custom field setup and enable custom field for a specific entity. It should now be visible in CDS.
Custom field is not visible in Form.
- Click on Personalize and Add field again (If it is already created).
Power Platform/ Power BI
Custom field can be used in Power Platform and for reporting purposes. We have to use CDS entities.
About our Specialist
Parag Chapre is working with FourVision as a Senior Developer for Microsoft Dynamics 365 Finance & Operations, Human Resources, Power BI and Power Platform. He is passionate about working on Microsoft technologies and helping people within the Dynamics Community for Dynamics 365 Human Resources.
About us
FourVision is Microsoft’s global leading Dynamics 365 Human Resources implementation partner. We have successfully implemented HR platforms in a variety of industries across multiple Microsoft environments for over a decade. FourVision also delivers an impressive suite of Web Apps that extend Microsoft Dynamics 365 Human Resources.